Image Editing Service Company Design Service Asia

Welcome To DSA Design Service Asia Long Term Agreement Unique Design Incredible Price Design Service Asia Quality Guarantee Business Agreement
Make your eCommerce product online store More Realistic and Generate extra Sales. DSA are Specialists on
Background Remove. Image masking. Drop shadow. Ghost Memiquin. Color Correction. Photo Retouching. Car editing.
Design Service Asia Clipping path high quality image editing starting at / photo
$0.39USD $0.39USD $0.39USD
Image Masking in Photoshop
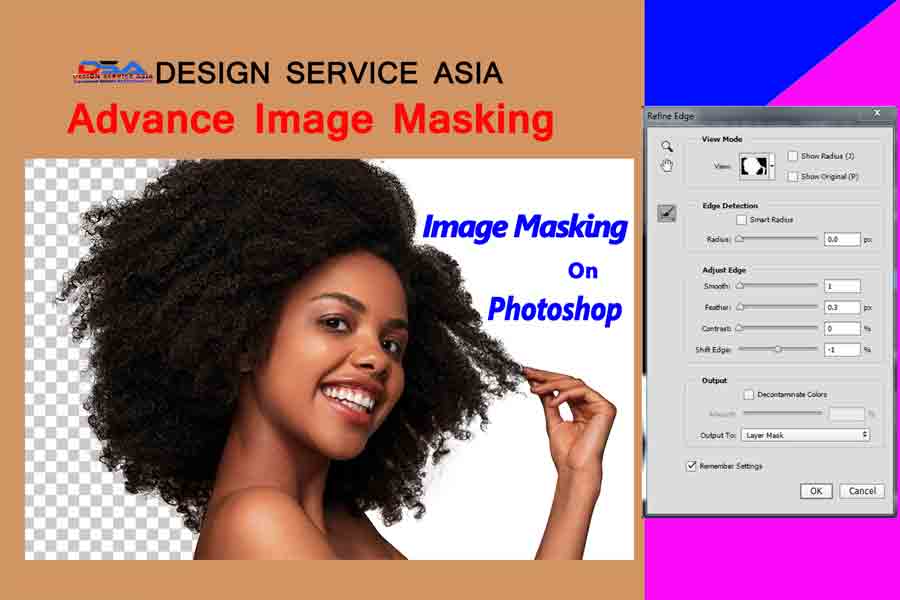
Image masking in photoshop
Image masking in Photoshop refers to the process of isolating or selecting specific parts of an image while hiding or blocking out other areas. This technique is commonly used to separate objects or subjects from their backgrounds, allowing for further editing or combining with other elements.
Layer Masks: Layer masks are non-destructive and versatile. They allow you to hide or reveal parts of a layer by painting on the mask with black, white, or shades of gray. Black conceals the area, white reveals it, and gray partially hides or reveals it.
To create a layer mask, select the layer you want to mask and click on the “Add Layer Mask” button at the bottom of the Layers panel. Use the brush tool to paint on the mask to hide or reveal areas as desired.
Clipping Masks: Clipping masks are useful when you want to apply the content of one layer to another layer based on their shape. The layer on top acts as a mask, determining the visibility of the layer below.
To create a clipping mask, position the layer you want to mask above the target layer. Right-click on the top layer and choose “Create Clipping Mask” from the context menu. The top layer will be clipped to the shape of the layer below.
Alpha Channel Masks: Alpha channel masks are typically used for complex selections or fine details. They store transparency information in an additional channel, allowing you to isolate specific areas of an image.
To create an alpha channel mask, make a selection using any selection tool (e.g., Magic Wand, Quick Selection, and Pen Tool). With the selection active, go to the Channels panel, click on the “Create New Channel” button, and the selection will be saved as an alpha channel. You can then edit the mask using painting or refining tools.
These are just a few of the many ways you can perform image masking in Photoshop. The choice of technique depends on the complexity of the image and the desired outcome. Experiment with different methods to achieve the best results for your specific project.
Image masking in photoshop guide for beginners:
Sure! Here’s a step-by-step guide on how to perform image masking in Photoshop for beginners:
Step 1: Open the image
Launch Adobe Photoshop and open the image you want to work with by going to “File” > “Open” and selecting the file from your computer.
Step 2: Duplicate the background layer
In the Layers panel (usually located on the right side of the screen), right-click on the background layer and choose “Duplicate Layer.” This step ensures that you have a backup of the original image in case you make any mistakes.
Step 3: Select the desired masking tool
There are several tools you can use for masking, but for beginners, the most common and user-friendly tools are the Quick Selection Tool and the Pen Tool. You can find them in the toolbar on the left side of the screen.
Quick Selection Tool: This tool allows you to select portions of an image based on similar colors and tones. Click on the Quick Selection Tool in the toolbar, then click and drag over the area you want to select. You can adjust the size of the brush using the bracket keys ([ or ]).
Pen Tool: The Pen Tool provides more control for precise selections. Click on the Pen Tool in the toolbar, and then click around the object you want to mask to create anchor points. Use these anchor points to create a path that accurately outlines the object.
Step 4: Refine the selection
Once you’ve made a rough selection using the Quick Selection Tool or created a path with the Pen Tool, you may need to refine it for better accuracy. In the Options bar at the top of the screen, you’ll find options to adjust the selection.
Select and Mask: Click on “Select and Mask” or “Refine Edge” (depending on your Photoshop version) in the Options bar to access additional tools for refining your selection. Use tools like the Refine Edge Brush or the Quick Selection Brush to refine the edges and ensure a smooth transition between the subject and the background.
Step 5: Apply the mask
Once you are satisfied with your selection, it’s time to apply the mask. In the Layers panel, you’ll find a “Layer Mask” button at the bottom. Click on it, and the selected area will be masked, hiding the background or other parts of the image.
Step 6: Fine-tune the mask (optional)
If you need to make further adjustments to the mask, select the Layer Mask in the Layers panel and use a brush tool (like the Brush Tool or the Eraser Tool) to paint on the mask. Black conceals the masked area, and white reveals it. You can also use different shades of gray for partial transparency.
Step 7: Save your work Once you are satisfied with the masked image, save your work by going to “File” > “Save” or “File” > “Save As” and choose your desired file format (e.g., JPEG, PNG, etc.).
That’s it! With these steps, you should be able to perform basic image masking in Photoshop as a beginner. Remember, practice makes perfect, so don’t hesitate to experiment and explore different techniques to improve your skills.
Design Service Asia Work instruction and Quality checking!!!!

Design Service Asia here is always ready to an agreement with our client who wants to work with us in long term business. If you interest please contact with DSA!!!

Important Link
Blog Post
| M | T | W | T | F | S | S |
|---|---|---|---|---|---|---|
| 1 | 2 | 3 | 4 | 5 | 6 | 7 |
| 8 | 9 | 10 | 11 | 12 | 13 | 14 |
| 15 | 16 | 17 | 18 | 19 | 20 | 21 |
| 22 | 23 | 24 | 25 | 26 | 27 | 28 |
| 29 | 30 | 31 | ||||